Hello friends!
Sorry it's taken me a while to get this up, but I've been recently under the weather with an upper respitory infection. I hate not being able to breathe through my
nose... especially at night!
In any case, quick update... what I've decided to do is NOT stick to a "craft a week", because some people may need more time than a week to work on their craft.
Every one has different schedules, so perhaps what I'll do is just put up a new craft when every one is done with the first one, has sent me some pics, etc. We'll
keep it leisurely. :)
And now, for the drawing tutorial!
What we will be drawing for our first time is a...
lighthouse! I hope this appeals to every one... I may put up an alternative drawing for every one to do, but let's start with this. And do NOT be intimidated... this is not about perfection, but FUN!!! :)
The first thing you'll need, obviously, is some supplies. Any kind of pencil, any kind of eraser, a ruler (only if you want), a black pen (for inking), and a piece of
paper. How's THAT for easy!
Now, the most important thing is to make yourself comfortable. Give yourself some "alone" time to do this... it's for you to enjoy, after all. :) Get a cup of
coffee, or a Coca Cola, whatever you need... chocolate works well. Get comfy in a chair or at your favorite table/desk, and just relax. Put on some music. Make
sure the light is good.
Now, let's start.
Sketch this triangle to begin. The lines can be sketchy, as mine are... you'll fix them later. And it does NOT have to be even, straight, whatever... just draw it.
When you are done with your triangle, make the bottom an oval. The triangle is the top of the lighthouse, and the oval is the opening on the bottom of the triangle.
Just try and make the oval reach from one side of the triangle bottom to the other.
OK, how's it going so far? Not too bad, right? :)
Next, you're going to draw four straight lines coming down out of the triangle. Keep the lines short, and remember, they don't have to be perfect, but they should all be the same length.
Now, make a slightly bent (or curved) rectangle along the bottom of the lines, like so.
Then, make a thinner, slighly longer rectangle along the bottom of that one.
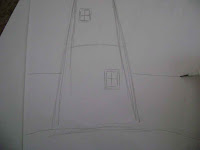
You're doing great! Now, we're going to make the body of the lighthouse. Simply draw two lines, starting from the thinner rectangle, going down and outwards, like in the picture.
In the center of the lighthouse body, make two lines, indicating the center portion. In other words, just make a center section of the lighthouse that would be a diffrent color from the top and bottom of the body. Then, draw three windows along the top of the body, wherever you want. Remember, this isn't going to look exactly like mine, just be creative and have fun.
Here is a picture of the windows in more detail. Really, they're just three squares with an open triangle on top of each, and a line across inside each. Not too
difficult!
Draw two more squares for other windows on the body, one in each section.
Then, draw a thin square around each of the two windows, and a cross in the center, for panes.
We're almost done! Now, along the bottom of the lighthouse, make a slightly curved line, for a hill on which the lighthouse sits. Make it look however you want.
Next, add water in the distance... a slightly wavy line in the background, starting from one side of the paper, behind the lighthouse, and finishing up on the other
side.
And there you have a lighthouse! NOW it's all up to you... first, ink the outline of your lighthouse. This is where the ruler comes in, if you want to make your
lines straight, here's where you can do it. If not, that's fine, too. Just use the pen over the pencil lines, only now you're making a solid black line, not sketchy
ones.
Once you've inked the drawing, wait for it to dry. Too many times have I tried to erase pencil lines from an inked drawing that wasn't yet dry, only to smudge my
inked lines! I really hate when that happens, as it totally ruins the drawing, so do yourselves a favor and wait till the lines are dry, maybe 20 minutes at the most.
And now, it's yours to do with what you want. Detail the grass with spikey lines. Make a sunny sky with birds, perhaps a rainbow. Shade the lighthouse with quick,
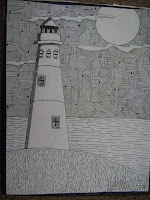
short lines, or color it in with colored pencils. The choices are virtually limitless... it's YOUR creation! Here's how mine turned out:
Post back here with ANY comments or questions you may have. Are you stuck on a certain part? Do you have advice to give that would make something easier? Write it
here! We'll all interact with one another, and when your masterpiece is finished, please email pics to me so we can all share them! My email is:
tracksaloquin@yahoo.com
Please, remember... the object is to have fun. Let me know if you need any help!
Posted by
Aloquin


7 comments:
Hi, fun subject - off I go to draw.
From looking at your tutorial it looks like fun and too easy! I know it isn't but am willing to take up the challenge!
Lets see how it goes. Promise to share if I'll made it worthy enough... :)
Happy Easter!
I love the variety of lines in the final drawing. This would be a great exercise to get high school students loosened up before doing an intense drawing.
I just got over the exact same thing. And it was a tough bug. Take care.
I just got over the exact same thing. And it was a tough bug. Take care.
You make it look so easy! I also like your advice of getting some chocolate! :)
I decided to do mine on a tie so I could tell myself I was stil "at work"! I made the mistake of thinking I could "see" the lines in my head (not wanting to pencil onto a tie!) but as you will see when I send you a pic, the windows are scew. Still with a bit of colour I'm sure it will look presentable! How do I send you a pic?
Post a Comment